How to Install a CPU Cooler Step by Step?
How to Install a CPU Cooler Step by Step
Installing a CPU cooler isn't complicated, but it's one of those steps where small mistakes cause big problems. A cooler that isn't seated properly, has too much or too little thermal paste, or is mounted with uneven pressure can leave your CPU running 15–20°C hotter than it should. That's enough to cause thermal throttling, instability under load, and in persistent cases, long-term wear on the chip. Getting it right takes ten minutes and the right approach.
This guide covers both air coolers and AIO liquid coolers, with the key differences called out where the process diverges.
What You'll Need Before You Start
Don't start the installation without having everything to hand. Stopping halfway to find a screwdriver or locate your backplate wastes time and increases the risk of making a mistake mid-process.
→ Your CPU cooler (with mounting hardware included in the box).
→ Thermal paste (most coolers include a pre-applied or included syringe; aftermarket paste is optional but fine to use). → A Phillips head screwdriver (usually a PH2).
→ Your motherboard manual (to confirm socket type and backplate requirements).
→ Isopropyl alcohol and a lint-free cloth (if you're reseating an existing cooler or replacing old paste).
→ Cable ties or velcro straps (for managing the cooler fan cable neatly).
One thing worth checking before you open anything: confirm your cooler is compatible with your CPU socket. Intel LGA1700 and LGA1851 boards use different mounting than AMD AM4 and AM5. Most modern coolers include hardware for multiple sockets, but it's worth verifying before you start rather than discovering a missing bracket halfway through.
Step 1: Prepare the Motherboard and CPU
If the motherboard is already installed in the case, you can still fit the cooler — but it's generally easier to do it with the board outside the case on a flat surface, particularly if you need to access the backplate from behind. Many builds require this anyway, as the backplate sits behind the motherboard and needs to be held in place while you thread the screws from the front.
✓ Remove any existing cooler if you're replacing one — unscrew it carefully and lift it straight up to avoid dragging across the CPU.
✓ Clean the CPU surface with isopropyl alcohol and a lint-free cloth if there's old thermal paste present — the surface should be completely clean and dry before applying fresh paste.
✓ Check that the CPU is properly seated in the socket and the retention arm is locked down (for Intel boards) or the screw collar is tightened (for AMD AM5).
✓ Locate the backplate mounting holes around the CPU socket — these are where the cooler's mounting posts or screws will pass through.
If your motherboard came with a pre-installed backplate — which is common on AM4 and AM5 boards — check whether your cooler requires you to remove it and replace it with the included one, or whether it clips onto the existing plastic bracket. AMD's stock backplate is compatible with many aftermarket coolers, but some brands include their own and require you to swap it out.
Step 2: Install the Backplate and Mounting Hardware
This step varies depending on the cooler brand and socket type, so refer to the included instruction sheet rather than relying on memory from a previous build. Instructions from Noctua, be quiet!, Cooler Master, and others differ in the order of steps and the specific hardware used.
For most Intel LGA1700 and LGA1851 builds:
✓ Feed the mounting posts through the backplate holes from the rear of the motherboard.
✓ Secure them with the provided standoffs or nuts on the front side of the board, tightening finger-tight for now.
✓ Attach the mounting brackets to the cooler base or to the motherboard depending on the specific cooler design.
For most AMD AM4 and AM5 builds:
✓ Use or replace the existing backplate as required by your cooler's instructions.
✓ Attach the mounting brackets to the cooler using the correct AMD-specific hardware from the kit.
✓ Thread the bracket screws into the backplate standoffs — hand tight only at this stage.
The common mistake here is over-tightening before the cooler is positioned. Snug is enough until the cooler is fully seated, at which point you apply final torque in a cross pattern.
Step 3: Apply Thermal Paste
Thermal paste fills the microscopic gaps between the CPU heat spreader and the cooler base, allowing heat to transfer efficiently. Without it — or with it applied incorrectly — you'll have air pockets acting as insulation between the two surfaces.
The debate about application method is largely overstated. For most builds, a small pea-sized dot in the centre of the CPU heat spreader is all you need. When the cooler is pressed down, the paste spreads naturally across the surface. You don't need to spread it manually, and you don't need more than a pea-sized amount — excess paste can squeeze out onto the motherboard, which is messy and potentially problematic around the socket area.
✓ Apply a pea-sized amount of paste to the centre of the CPU.
✓ Do not spread it manually — let the cooler pressure do the work.
✓ Do not apply paste to the cooler base — only to the CPU surface.
✓ Do not apply multiple dots or lines unless the cooler manufacturer specifically recommends it for large-die CPUs.
If your cooler came with pre-applied paste on the base (common with stock coolers and some budget aftermarket options), you don't need to add more. Just check the pre-applied layer is intact and hasn't dried out or been contaminated.
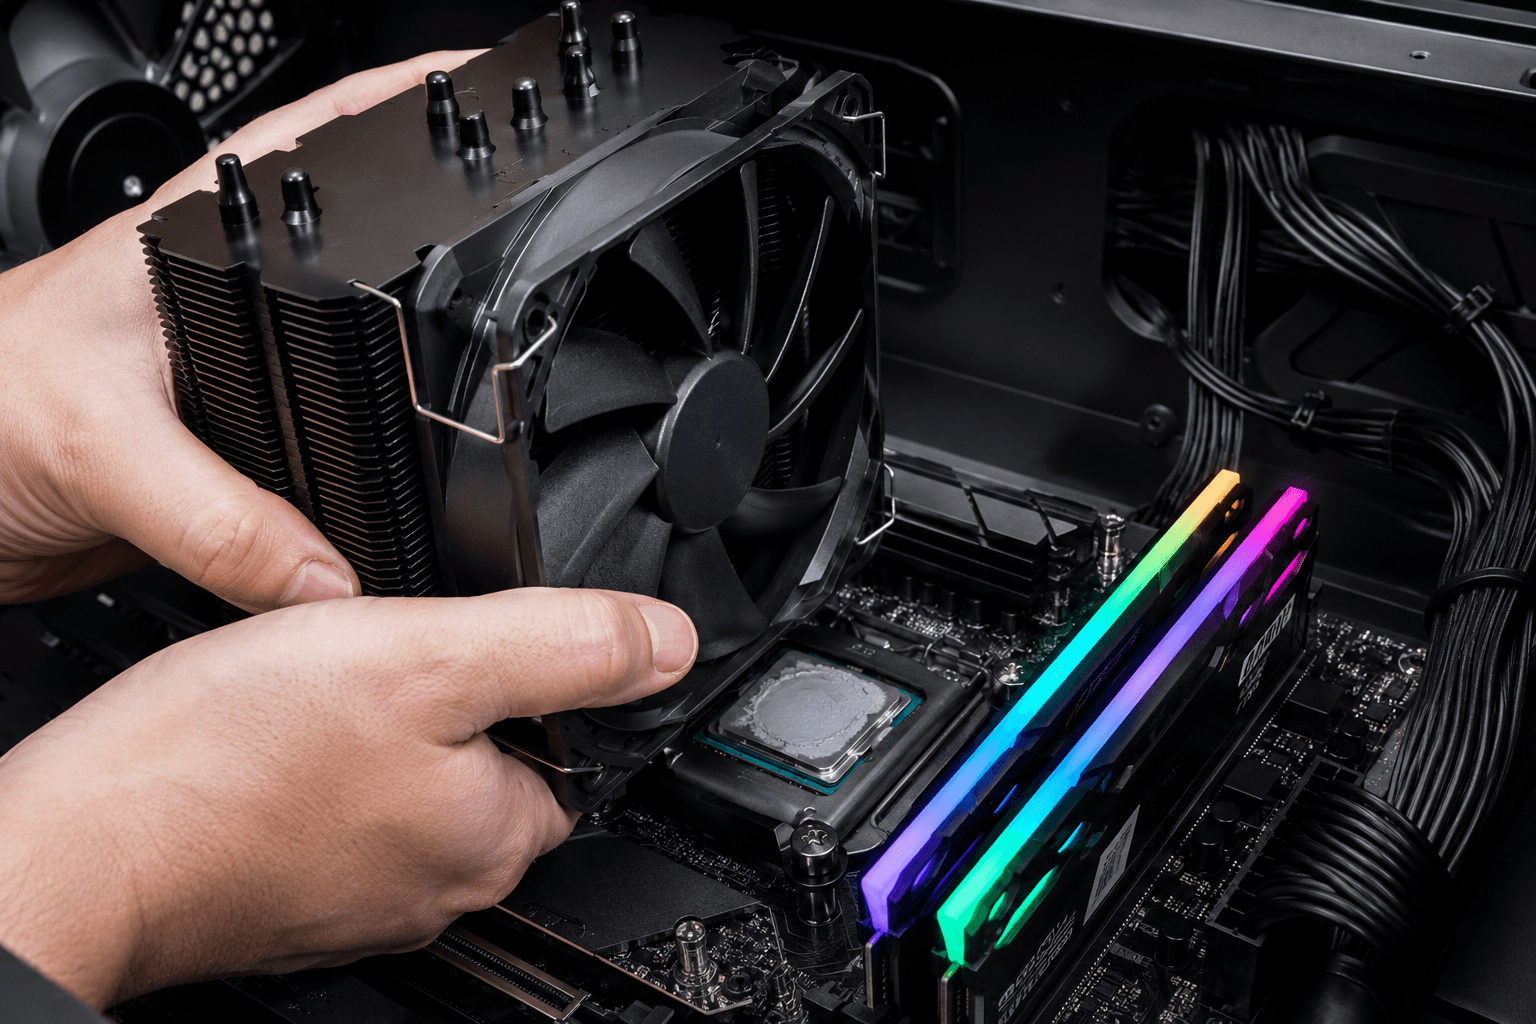
Step 4: Mount the Cooler
This is where the installation comes together. Lower the cooler onto the CPU carefully, aligning the mounting holes with the standoffs or brackets you've already positioned.
✓ Lower the cooler straight down — avoid sliding it sideways once the paste makes contact, as this smears the paste unevenly.
✓ Hold the cooler in position with one hand while you start threading screws with the other.
✓ Tighten in a cross pattern — top-left, bottom-right, top-right, bottom-left — rather than going around in a circle. This applies even pressure across the surface and prevents one edge lifting while the other compresses.
✓ Tighten until you feel firm resistance — do not crank hard. CPU cooler screws are designed to reach a specific pressure point; overtightening risks cracking the PCB around the mounting holes or warping the cooler base.
For tower coolers with a single central mounting screw or clip mechanism, the same principle applies — steady even pressure, not maximum torque.
Step 5: Connect the Fan and Check Clearances
Once the cooler body is secure, the fan needs to be attached if it wasn't pre-installed, and the cable needs routing to the correct header on the motherboard.
✓ Attach the fan to the heatsink using the wire clips or screws provided — the fan arrow should indicate airflow direction toward the rear exhaust of the case.
✓ Connect the fan cable to the CPU_FAN header on the motherboard — this is usually clearly labelled and located near the top of the board close to the socket.
✓ Check RAM clearance — tall tower coolers sometimes overhang the first DIMM slot; if your RAM doesn't fit, some coolers allow the fan to be repositioned higher up the fins.
✓ Check case clearance — verify the cooler fits within the maximum CPU cooler height listed in your case specifications before attempting to close the side panel.
Forgetting to connect the fan cable is more common than it sounds, particularly when you're focused on other things. If the CPU_FAN header has no signal, most motherboards will immediately throw a fan error on boot and halt the system — which is a safety feature, but one that causes unnecessary panic if you weren't expecting it.
Installing an AIO Liquid Cooler: Key Differences
The process for an AIO (all-in-one) liquid cooler follows the same principles for the CPU block mounting — paste application, mounting pressure, and cross-pattern tightening all apply. The main differences are around radiator placement and cable management.
✓ Mount the radiator in the correct position first — front intake or top exhaust are the most common, depending on your case layout. We covered how radiator position affects overall system temperatures in the case airflow guide, which is worth reading if you're deciding where to mount it.
✓ Route the tubes carefully — avoid tight bends and ensure tubes aren't under tension from the CPU block pulling in one direction.
✓ Connect the pump cable to CPU_FAN or a dedicated pump header — check your motherboard manual, as some boards have a specific AIO_PUMP header that's designed to run at full speed constantly.
✓ Connect any USB 2.0 headers required for RGB or pump control software — these are internal headers on the motherboard, not external USB ports.
One thing worth knowing: AIO coolers don't always outperform high-end air coolers. A 240mm AIO will typically trade blows with a quality 120mm tower cooler like a Noctua NH-U12S, sometimes winning, sometimes not, depending on the specific hardware and ambient conditions. If you want a full comparison before committing, the PSU wattage planning guide also touches on power considerations for systems with high-TDP coolers and components — worth factoring into your overall build planning.
Common Mistakes That Cause High CPU Temperatures After Installation
These are the issues that most commonly appear in systems that come in for temperature-related problems after a self-build:
✓ Too much thermal paste — excess paste squeezes out around the edges and can get into the socket area; more paste does not mean better cooling.
✓ Uneven mounting pressure — tightening one side fully before the other lifts the opposite edge and creates an air gap under part of the cooler base.
✓ Cooler not fully locked down — it can feel secure without actually being seated correctly; double-check that all screws are fully threaded and snug.
✓ Wrong fan orientation — a fan blowing the wrong direction doesn't cool the heatsink, it pushes warm case air into it.
✓ Forgetting to remove the protective film — some cooler bases ship with a thin plastic film over the copper or aluminium contact surface; leaving it on produces catastrophic temperatures immediately.
If your CPU temperatures are unexpectedly high after installation and you've checked the obvious things, the most likely cause is uneven mounting pressure or insufficient thermal paste contact. Reseating the cooler — cleaning off the old paste and starting fresh — almost always fixes it.
After Installation: Checking Temperatures
Once the system boots, check CPU temperatures before closing the case up. Idle temperatures for most modern CPUs should sit between 30–45°C depending on the chip and ambient room temperature. If you're seeing 60°C+ at idle, something is wrong with the installation and it's better to address it immediately than leave it running.
Under load — running a game or a stress test for a few minutes — most mid-range CPU coolers should keep a mainstream gaming CPU below 85°C. High-end coolers on efficient CPUs will often stay below 70°C under sustained load. If you're exceeding these thresholds, consider whether the cooler is appropriate for the CPU's TDP, whether the case airflow is adequate, and whether the mounting is correct.
If you're unsure whether your build is within normal parameters or you've hit a problem you can't diagnose, feel free to get in touch with the team — we deal with cooling issues and build diagnostics regularly and can point you in the right direction.
Frequently Asked Questions
Do I need to apply thermal paste if my cooler already has some on it?
No. If the cooler base has pre-applied thermal paste — usually a grey strip or pad — you can use it as-is. Don't add more on top. If the pre-applied paste looks dried out or damaged, clean it off and apply fresh paste before installing.
How tight should CPU cooler screws be?
Firm but not cranked. You should feel resistance and the cooler shouldn't move, but you shouldn't be forcing it. Most CPU cooler screws are designed with a stopping point — tighten until the screw stops turning easily, then stop.
Can I reuse thermal paste?
If you're temporarily removing a cooler and reinstalling it the same day, the paste can sometimes be reused if it's still wet and hasn't dried out. But for any proper reinstall, clean both surfaces with isopropyl alcohol and apply fresh paste. Old, dried paste transfers heat poorly.
Does the brand of thermal paste matter?
For most gaming builds, the difference between mid-range pastes is a degree or two at most. Arctic MX-6, Noctua NT-H1, and Thermal Grizzly Kryonaut are all solid options. Avoid the tiny grey syringes included with cheap coolers — the quality is inconsistent.
How do I know if my cooler is compatible with my socket?
Check the cooler's specifications against your CPU socket type — LGA1700, LGA1851, AM4, AM5 are the most common current sockets. Most cooler manufacturers list compatible sockets on the box and product page. If in doubt, check before buying.
My PC is running hot after installing a new cooler — what should I check?
Start by verifying the fan is connected to the CPU_FAN header and spinning. Then check that the cooler is fully seated with even pressure on all mounting points. If temperatures are still high, remove the cooler, clean both surfaces, reapply thermal paste, and reinstall. Uneven mounting or insufficient paste contact is the most common cause.
Is it worth paying more for a premium CPU cooler?
For mid-range gaming builds with CPUs like the Ryzen 5 or Core i5 range, a quality £30–50 air cooler does an excellent job. The gains from spending £80–100 on a top-tier cooler are real but relatively small for mainstream gaming workloads. If you're running a high-TDP processor or doing sustained CPU-heavy work alongside gaming, the investment makes more sense.
CPU cooler installation is one of those skills that feels fiddly the first time but becomes second nature after a couple of builds. Take your time with the paste application and mounting, use the cross-tightening pattern, and verify temperatures before closing everything up. Get those steps right and you won't need to think about it again until it's time to upgrade.